How to setup Nexmosphere XT-4F touch buttons on LG devices
In this tutorial we will use
- Nexmosphere's XT-4F module which contains
- 4 small size capacitive touch buttons (16mm)
- 4 bright controllable LEDs
- Nexmosphere's XN-180 Xperience controller
Setup sensor
- Connect the Xperience controller to the LG screen via serial-jack-jack cable, then attach the X-touch to the controller's first port
- Go to Home page right click on the LG screen then navigate yourself to Manage screen >> Device Properties >> Set sensor configuration
- In the
Sensor configfield insert the following configuration
Sensor configuration
{
  "services":[
    {
      "uid":"nexmosphere",
      "type":"GENERIC",
      "settings":{
        "rules":[
          {
            "pattern":"(\\w\\d{3}\\w)\\[(\\d*)]",
            "idGroupIndex":1,
            "valueGroupIndex":2
          },
          {
            "pattern":"(\\w\\d{3}\\w)\\[(TR|TD)=UID:([A-Za-z0-9]*)]",
            "idGroupIndex":1,
            "eventGroupIndex":2,
            "valueGroupIndex":3
          },
          {
            "pattern":"(\\w\\d{3}\\w)\\[(\\w*)=([A-Za-z0-9]*)]",
            "idGroupIndex":1,
            "eventGroupIndex":2,
            "valueGroupIndex":3
          }
        ]
      },
      "connection":{
        "port":"3",
        "parity":0,
        "baudrate":115200,
        "dataBits":8,
        "stopBits":1,
        "flowControl":0
      }
    }
  ]
}
After you sat the configuration, enable the Show console window on your device, when you interact with the buttons it will show the actual sensor's ID and Value, which will prove the connection between the sensor and the LG screen.
Content
-
Create 4 Other pages with individual names
-
On the right top corner, navigate yourself to Properties >> Content then scroll down to Edit sensor events
-
Click on the
Add newbutton. -
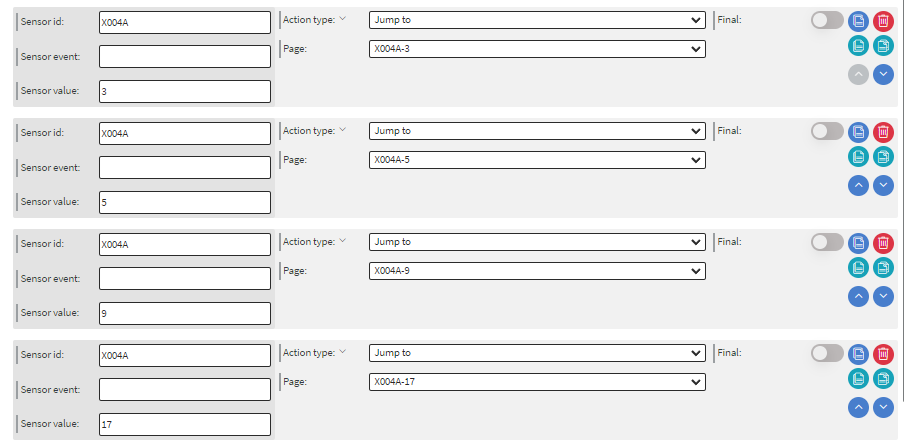
Choose
Jump toasAction type, then select the page as target -
Under the sensor events, in the
Input settingsmodal, enable the Allow specifying sensor ids and Allow specifying sensor values options.
 |
|---|
- Please fill the
Sensor idandSensor valueboxes on the left side, so each sensor event will specify listening for only the assigned id and value, so they can easily jump to the right page.
 |
|---|
Each sensor has an unique ID, event and value. Please make sure the ID and value is connected to the same sensor, otherwise the sensor events will not work correctly.
- After you created the sensor events, create 1 more event with the same action type, and choose the default page as target.
- In here only fill the sensor value with 0, and leave the other boxes alone. This action will be triggered when you put release the buttons.
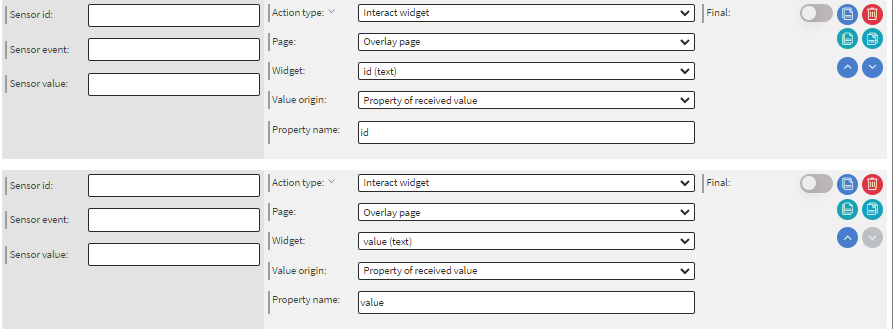
If you want to track the actual Value and ID on the actual page then follow the steps below:
- Create an overlay page
- Add 2 text widgets to the overlay page, then fill them with Value and ID as indicators
- Duplicate them, then in the Layers section name them as id and value for better u
- Navigate yourself to Properties >> Content then scroll down to Edit sensor events
- Add a new action
- Choose
Interact widgetasAction type, then select the overlay page, and the widget. - As
Value originselect theProperty of received value, this way you can define which value must be shown inside the widget.- In this case we selected the id(text) named widget as the affected widget.
- Define the
Property nameaccording to the value you wish to see inside the widget.- Here we defined id
- Please do not fill the boxes on the left side.
- Repeat it with value.
 |
|---|
If you do not need this setup, feel free to skip it.
- After you finished it, save the content, then assign it to the LG screen.
Testing the content
- When you interact with the buttons on, the content will jump to the page with the matching sensor value.
