Teams menu
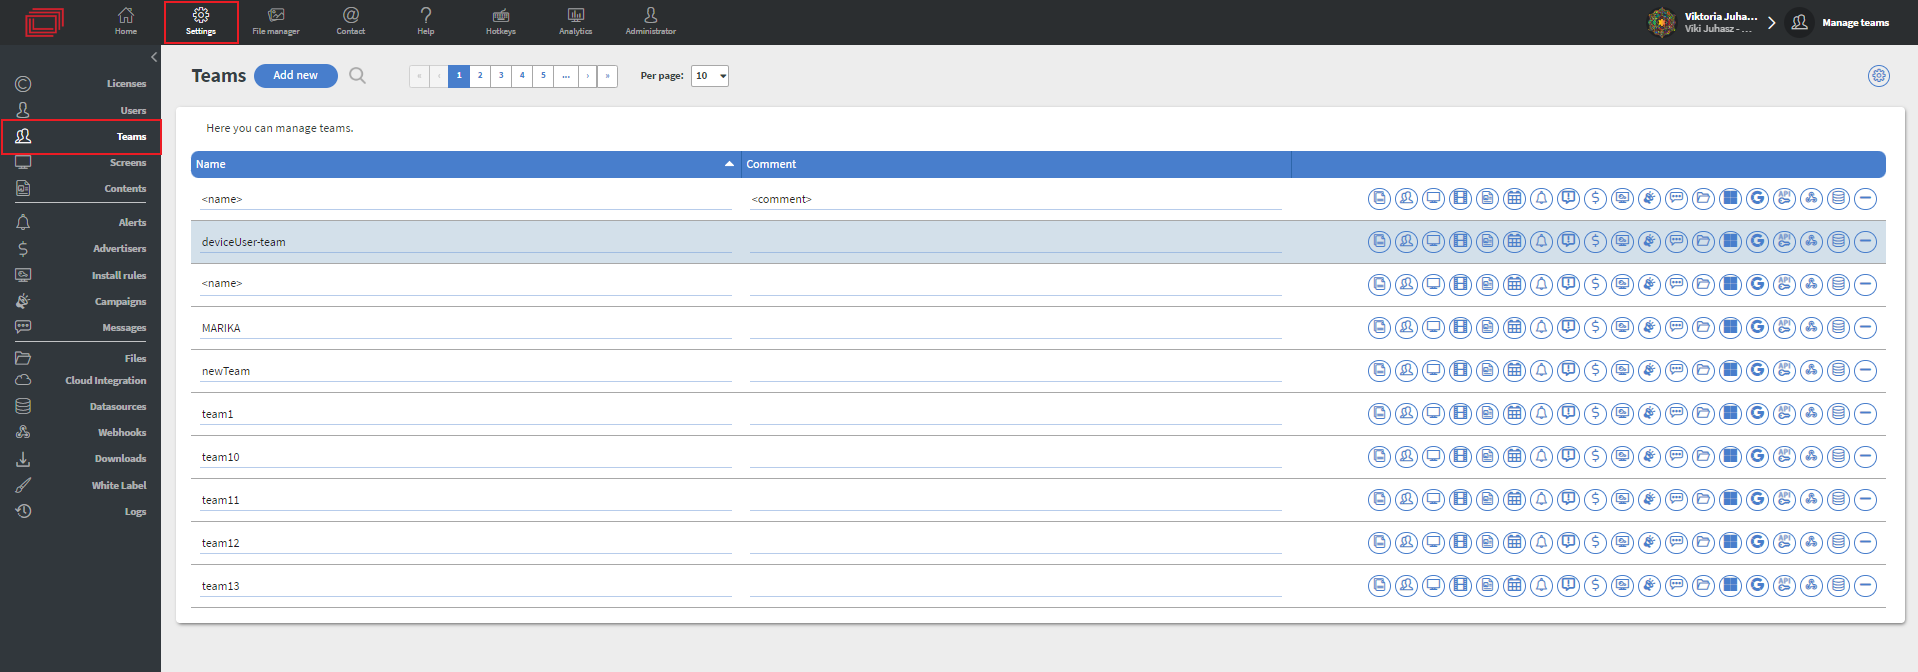
In Teams menu you can create teams, and manage them.

With the help of teams, the users of a customer can easily manage the available resources apart from each other.
A big company with many sites is using different products at different prices. It results in many resources, for example, pictures, videos, datasources, contents, and screens, and it can be very overwhelming to manage. For better management purposes, you can create teams and can assign resources to them
Create teams
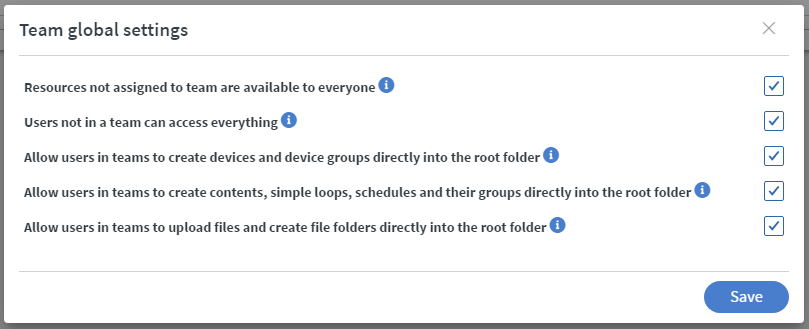
When you first make teams, you need to select a few global settings to your liking:

- Resources not assigned to team are available to everyone
- if turned off, only the owner can access the resources without teams, if turned on everyone can see them.
- Users not in a team can access everything
- if turned off, these users cannot access anything
You can modify these setting later.
Setting up teams
To create teams, click on the “Add new button”
- First you have to add a name to your content
- You can add comments if necessary
- After you filled these fields, you have to click on the save button next to the add New button
Your team will look like this:
![]()
When you saved your team(s), you can add and manage several things:
- Copy team id
- Manage Users
- Manage Screens
- Manage Loops
- Manage Contents
- Manage Schedules
- Manage Alerts
- Manage Notification Channels
- Manage Advertisers
- Manage Install rules
- Manage Campaigns
- Manage Messages
- Manage Files
- Manage Microsoft Credentials
- Manage Google Credentials
- Manage Webhook API keys
- Manage Webhook event actions
- Manage Datasources
- Remove team
From a user’s point of view, he can only see the resources assigned to his team, except if the Owner/Administrator turned on the “resources not assigned to team are available to everyone” option.
Then, he will see the team’s resources and the unassigned resources too. He will not see other teams’ resources.
When you select a folder in the resource manager (icons on the right side) it will not be select everything in it. You have to manually assign resources to the team.
You can assign resources to teams in many places, not just in the Settings/Teams menu.
Here is a list of where to find them.
User
- Settings/Users/Edit user
- Settings/Users -> Add new
Loop/content/schedule
- Home/
- When adding new loop/content/schedule
Datasource
- Settings/Datasources/Edit datasource
- Settings/ New database
Files
- When uploading a new file in the file manager
- File manager/…/Edit teams
Alerts and Notification channels
- Settings/Alert rules -> Edit/Create
- Settings/Notification channel -> Edit/Create
Advertisers
- Settings/Advertiser -> Edit/Create
Install rules
- Settings/Install rules -> Edit/Create
Campaigns and Messages/Message Groups
- Settings/Campaigns -> Edit/Create
- Settings/Message Groups -> Edit/Create
- Settings/Messages -> Edit/Create
Cloud Credentials
- Settings/Cloud Credentials ->/Edit/Create
Webhooks and Webhook API keys
- Settings/Webhooks -> /Edit/Create
- Settings/Webhook API keys -> /Edit/Create
-
Teams can’t be the member of another team, but a user can belong to multiple teams.
-
Users with Owner or Administrator roles can see and manage every team inside the customer.
-
A content can contain resources that one team can see while the other doesn’t. The visibility doesn’t matter in the displayer, only in the Editor.
-
A content that belongs to a team can be inside a folder that is not shared with the team.