Advanced device configuration options for Android players
Where can you set these configurations?
Navigate to the Devices menu and select the device where you wish to set the advanced configs.
- In the details tab, select
Settings, scroll down until you find theAdvanced configmodal.
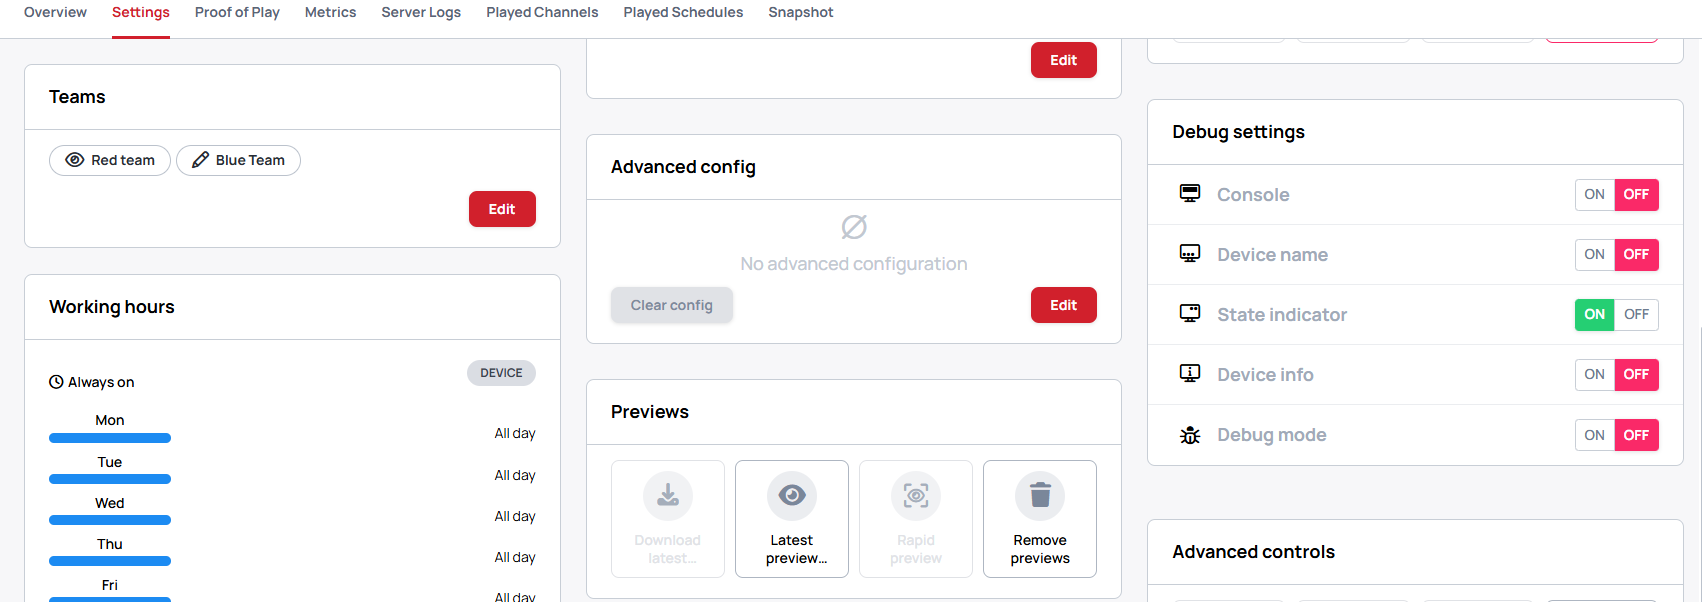
- Click on the
editthen place theconfigto the box
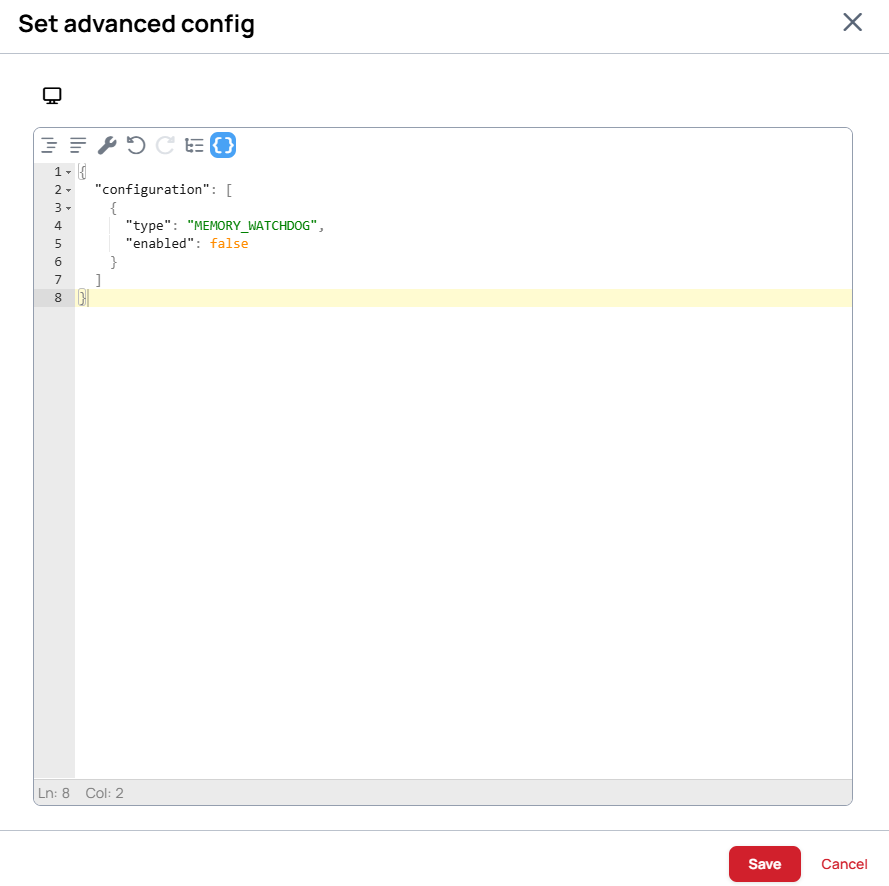
Clear button only clears the input field to an empty json. Sending this json doesn't disable the previous configuration of the device.
Generic advanced configuration options for Android devices
These advanced configuration options work on all supported Android devices.
The basic configuration structure is the following json array, which contains the actual configuration objects
{
  "configuration": [
    {
    }
  ]
}
There can be multiple objects inside a singe command. For example you can enable both debug mode and memory watchdog in the same Advanced configuration json
{
  "configuration": [
    {
      "type": "DEBUG_MODE",
      "enabled": true
    },
    {
      "type": "MEMORY_WATCHDOG",
      "enabled": true,
      "maxMemoryLimitFraction": 0.8
    }
  ]
}
enabledkey has to be defined, value has to be a non-empty booleanmaxMemoryLimitFractionkey has to be defined, value has to be number. The minimum limit is0.4, the maximum is1.0.
Set a custom NTP server
Available in Android client 5.0.657 or later. Set the preferred NTP server used to synchronize the device's clock.
{
  "configuration": [
    {
      "type": "NTP_SERVER",
      "enabled": true,
      "serverUrl": "pool.ntp.org"
    }
  ]
}
- Set
enabledtotrueto use the override orfalseto clear it. - For
serverUrl, use an NTP hostname or IP address. Anntp://prefix is also accepted, for examplentp://pool.ntp.org.
The setting is retained after an application or device restart. If the custom NTP server is unavailable, the player tries the built-in external NTP server, then the Wallboard server's NTP service, then the Wallboard server's time over HTTP.
To clear the override and return to the default time sources, send:
{
  "configuration": [
    {
      "type": "NTP_SERVER",
      "enabled": false
    }
  ]
}
A blank serverUrl also clears the override. Removing the NTP_SERVER block or sending an empty configuration does not disable a previously saved setting.
Set time synchronization interval
Available in Android client 5.0.657 or later. The player checks the time every 15 minutes by default. Use this command to change how often it checks.
{
  "configuration": [
    {
      "type": "TIME_SYNC",
      "enabled": true,
      "syncInterval": 300
    }
  ]
}
The example sets the interval to 5 minutes. Changes apply immediately without restarting the application or device, and the setting is retained after a restart.
- Set
enabledtotrueto apply a custom interval. syncIntervalis required whenenabledistrue. Use a whole number of seconds from120to3600, inclusive. The default is900seconds (15 minutes).- A numeric
syncIntervaloutside this range clears the custom interval and restores the default.
To restore the default interval, send:
{
  "configuration": [
    {
      "type": "TIME_SYNC",
      "enabled": false
    }
  ]
}
This clears the saved custom interval and restores the 15 minute default; it does not disable time synchronization. Removing the TIME_SYNC block or sending an empty configuration keeps the previously saved interval.
Screen control
Control screens
{
  "configuration": [
    {
      "type": "SCREEN_CONTROL",
      "serialConnection": {
        "baudrate": 9600,
        "port": "0",
        "dataBits": 8,
        "stopBits": 1,
        "parity": 0,
        "flowControl": 1
      },
      "socketConnection": {
        "address": "localhost",
        "port": 1234
      },
      "commands": [
        {
          "action": "SCREEN_ON",
          "method": "serial",
          "messageType": "string",
          "message": "TOF/n"
        },
        {
          "action": "SCREEN_OFF",
          "method": "cec",
          "messageType": "byte",
          "message": "x64x13"
        }
      ]
    }
  ]
}
The port parameter here must be specified, you can find more information about how to find the port here
Parameters
commandshas to be an array type containing validScreenControlCommandobjectsactionkey has to be defined, and one of the following values:SCREEN_ON,SCREEN_OFFmethodkey has to be defined, one of the following values:serial,socket,cecmessageTypekey has to be defined, and one of the following values:byte,stringmessagehas to be defined- In case of string
messageTypethey have to be non-empty strings for exampleTOF/n - In case of byte
messageTypethey have to be separated by an x for examplex25x24x12orx64x54
- In case of string
Screen configuration
Currently the Screen configuration is only supported on the Giada D77 Android device
{
  "configuration": [
    {
      "mode": "SPLIT",
      "type": "SCREEN_CONFIGURATION",
      "enabled": true,
      "fullWidth": 3840,
      "fullHeight": 2160,
      "screens": [
        {
          "screenX": 0,
          "screenY": 0,
          "outputName": "HDMI-A-1",
          "screenWidth": 1920,
          "screenHeight": 1080
        },
        {
          "screenX": 1920,
          "screenY": 0,
          "outputName": "HDMI-A-2",
          "screenWidth": 1920,
          "screenHeight": 1080
        },
        {
          "screenX": 0,
          "screenY": 1080,
          "outputName": "DP",
          "screenWidth": 1920,
          "screenHeight": 1080
        },
        {
          "screenX": 1920,
          "screenY": 1080,
          "outputName": "DSI",
          "screenWidth": 1920,
          "screenHeight": 1080
        }
      ]
    }
  ]
}
Parameters
modedefines the multi-screen configuration mode the value can beMIRRORorSPLITfullWidthfullHeightthese define the maximum width and height of the multi-screen configurationscreenXscreenYdefines the physical screen position in the multi-screen configurationoutputNamethe name of the Hdmi connectorscreenWidthscreenHeightdefine the physical resolution of the screen
Show debug logs
Sometimes the support team requires a device log from the users to find out what causes a problem on the device. Enabling the debug log on the device will show more information for us in the device log.
{
  "configuration": [
    {
      "type": "DEBUG_MODE",
      "enabled": true
    }
  ]
}
enabledkey has to be defined, value has to be a non-empty boolean
Set WebView basic authentication for HTTP stream
Set authentication details for secured HTTP streams
{
  "configuration": [
    {
      "type": "WEBVIEW_BASIC_AUTHENTICATION",
      "credentialList": [
        {
          "domainUrl": "PROTOCOL://DOMAIN:PORT/PATH",
          "userName": "AUTH_USER_NAME",
          "password": "AUTH_PASSWORD"
        }
      ]
    }
  ]
}
credentialListhas to be an array type containing validcredentialListobjects
Examples on how to fill data in the configuration:
{
  "configuration": [
    {
      "type": "WEBVIEW_BASIC_AUTHENTICATION",
      "credentialList": [
        {
          "domainUrl": "http://192.168.1.166:8080/",
          "userName": "MyUserName",
          "password": "MyPassword"
        }
      ]
    }
  ]
}
{
  "configuration": [
    {
      "type": "WEBVIEW_BASIC_AUTHENTICATION",
      "credentialList": [
        {
          "domainUrl": "http://mystreamhost.infoo/",
          "userName": "MyUserName",
          "password": "MyPassword"
        }
      ]
    }
  ]
}
Set stream playback delay
Overwrites the default stream playback delay of the Hardware Accelerated Player to start playing the stream from the buffer faster or more delayed. The default value is 1500 (ms), and the configuration only accepts values between 500 and 5000.
{
  "configuration": [
    {
      "type": "NETWORK_STREAM_DELAY",
      "delay": 2000
    }
  ]
}
delaykey has to be defined, value has to be number, time is in milliseconds. The minimum limit is500, the maximum is5000.
Turn on Wifi automatically
After the configuration is sent, the device turns on the Wifi, and every time the Wallboard application starts, it turns on the Wifi if it is turned off.
If the configuration is sent with a false value, it turns off the function.
{
  "configuration": [
    {
      "type": "WIFI_ALWAYS_ON",
      "enabled": true
    }
  ]
}
enabledkey has to be defined, value has to be a non-empty boolean.
Turn on trust all webpages
This command allows the device to load untrusted sources into the WebView.
Enabling this feature carries a certain level of risk. Once this feature is activated, we cannot accept responsibility for any unexpected outcomes that may occur
{
  "configuration": [
    {
      "type": "TRUST_ALL_PAGES",
      "enabled": true
    }
  ]
}
enabledkey has to be defined, value has to be a non-empty boolean.
Turn on system memory watchdog
This command turns on a system memory watcher. If the device reaches the given percent limitation the application makes steps to free up used memory by restarting itself. If the memory limit is exceeded a few times the application reboots the device to free up even more memory.
The minimum limit is 0.4, the maximum is 1.0.
{
  "configuration": [
    {
      "type": "MEMORY_WATCHDOG",
      "enabled": true,
      "maxMemoryLimitFraction": 0.7
    }
  ]
}
enabledkey has to be defined, value has to be a non-empty booleanmaxMemoryLimitFractionkey has to be defined, value has to be number. The minimum limit is0.4, the maximum is1.0.
Turn on IR handling
The Wallboard application disables the IR handling of the device by default to prevent people from turning off the device or causing any trouble. With this command, you can turn it on to allow the users to control the device with IR remote controllers.
If you turn on this function the Wallboard signage contents will not react to IR commands, only the device will receive them.
{
  "configuration": [
    {
      "type": "DEVICE_IR_HANDLING",
      "enabled": true
    }
  ]
}
enabledkey has to be defined, value has to be a non-empty boolean.
Device Preview
The Preview creation/upload can be disabled with this command
enabled turns the Device's own screenshot uploads on or off. previewDelayMs is optional and sets how long the Device waits before taking a shot, in milliseconds — it is not the interval between uploads, which is fixed.
Learn more: The preview image
{
  "configuration": [
    {
      "type": "DEVICE_PREVIEW",
      "enabled": true
    }
  ]
}
Device Statistics
The device Metric and Proof of Display statistics collection can be triggered with this command
{
  "configuration": [
    {
      "type": "STATISTICS_SETTINGS",
      "deviceMetricsEnabled": true,
      "displayTimeStatEnabled": true
    }
  ]
}
- The
deviceMetricsEnabledparameter can be used to turn on or off the device metric Metric collection and upload - The
displayTimeStatEnabledparameter can be used to turn on or off the Proof of Display statistics collection and upload
ProDvx API authorization token
The ProDvx device management API requires an authorization token, the application has a base token built into it, but if another token is necessary then it can be changed with this configuration.
{
  "configuration": [
    {
      "type": "PRODVX_TOKEN",
      "enabled": true,
      "token": "TOKEN"
    }
  ]
}
If the enabled property is set to false the application will fall back to using the built-in base token
Select the device API (ProDvx on Android 9 or older)
On ProDvx devices running Android 9 or older, the device API must be explicitly set to PRODVX in the advanced configuration — otherwise ProDvx-specific device management calls will not work.
{
  "configuration": [
    {
      "api": "PRODVX",
      "type": "DEVICE_API",
      "enabled": true
    }
  ]
}
Required only on ProDvx devices with Android 9 or older. Newer Android versions detect the correct device API automatically.
Watchdog
The built-in watchdog can be disabled or enabled by this configuration.
The watchdog is enabled by default except on Amino devices!
{
  "configuration": [
    {
      "type": "WATCHDOG",
      "enabled": true
    }
  ]
}
Qbic specific advanced configuration options
These advanced configuration options are only available on Qbic players.
Set Qbic application update URL
Change Qbic device's application update URL
{
  "configuration": [
    {
      "type": "QBIC_APPLICATION_UPDATE_URL",
      "url": "https://qbic.wallboard.info/app/wallboard-release.xml"
    }
  ]
}
Set Qbic firmware update URL
Change Qbic device's firmware update URL
{
  "configuration": [
    {
      "type": "QBIC_FIRMWARE_UPDATE_URL",
      "url": "PLACE_URL_HERE"
    }
  ]
}
Qbic HDMI / CEC control
Enable HDMI / CEC control for Qbic device
{
  "configuration": [
    {
      "type": "QBIC_HDMI_CEC",
      "enabled": true
    }
  ]
}
Qbic on/off type
This configuration only allows choosing the turn on/off method.
HDMI output
Allows the device to turn on/off the output source, the device gives to the screen. The disadvantage is that it does not turn off the screen.
{
  "configuration": [
    {
      "type": "QBIC_DISPLAY_STATE_COMMAND",
      "command": "HDMI"
    }
  ]
}
CEC
Allows the device to turn on/off the CEC capable screen through HDMI.
{
  "configuration": [
    {
      "type": "QBIC_DISPLAY_STATE_COMMAND",
      "command": "CEC"
    }
  ]
}