GPIO output
Configuration
{
	"services": [
		{
			"uid": "gpio",
			"type": "GPIO",
			"settings": {
				"openForRead": [
					{
						"id": "GPIO0",
						"pin": 0,
						"lowEvent": "GPIO_0_OFF",
						"highEvent": "GPIO_0_ON"
					},
					{
						"id": "GPIO1",
						"pin": 1,
						"lowEvent": "GPIO_1_OFF",
						"highEvent": "GPIO_1_ON"
					}
				],
				"openForWrite": [
					{
						"id": "GPIO2",
						"pin": 2
					},
					{
						"id": "GPIO3",
						"pin": 3
					}
				]
			}
		}
	]
}
Simple usage in content
Preparations
In this tutorial We will use a GPIO controller and a Brightsign XT4 device.
The controller uses the Brightsign's GPIO connector, so you have to attach the GPIO into your device.
The port direction is left to right, so you have to insert the GPIO into the GPIO connector starting from the left.
Set sensor configuration
- After this you have to go to the Wallboard Editor site, where you have to click onto the Brightsign device, choose
Device Properties >> Set >> Set Sensor Configuration
Content
- Create a new content, then you will need only the Default page.
- Position two stopper widgets on the canvas and configure each with a 10-second countdown.
- Put 2 text widgets under them, then add the ON and OFF state to them. This will indicate the current state of the GPIO button.
- You have to disable the automatic start on the stopper widget which will determine the closed state.
- You can find it in the Advanced option on the Properties menu.

Your Content should look like this:

The first timer will do the following:
When the timer reaches 0, the GPIO button will switch to the open state.
The second timer will do the following:
When the timer reaches 0, the GPIO button will switch to the closed state.
Edit stopper actions
- Click on the first stopper widget then go to the
Properties >> Other >> Edit Stopper Actions
After this Set the following end actions:
On state on stopper widget
Generic sensor action
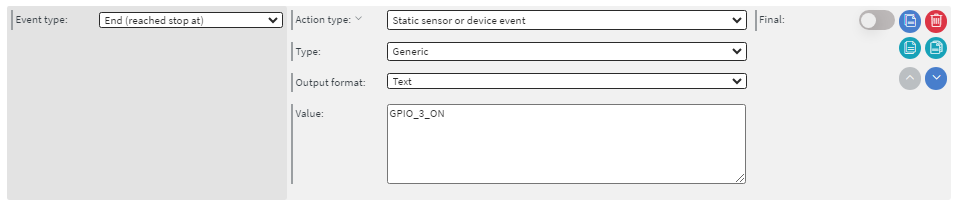
Right here in the Stopper Actions settings you have to choose as event type the following: End (reaches stop at)
- Then Static sensor or device action,then set the action type to Generic.
- The output format should be text.
- The value you will send out to the sensor will be the following: GPIO_3_ON
- This will send a message to the sensor to switch it's 3rd button's state into Open state.
This is the value that comes back when you trigger the button with your own hands and release it (GPIO_3_ON >> released state).
Repetative actions
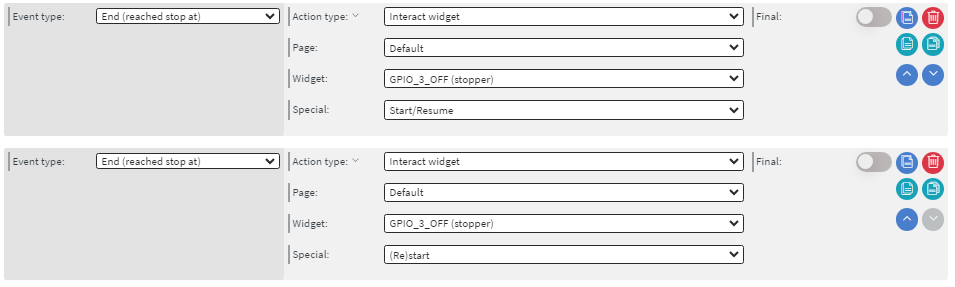
To make the actions repetative you have to add these actions to the widget, these will restart and delay the other state's stopper widget.
The 1st event on this picture will delay the OFF state widget's starting time.
This way the actions can be continuous, they will not bother each other's function.
The 1st action should be set only as the ON state widget's stopper action, to delay the OFF state widget!
Event received - indicator
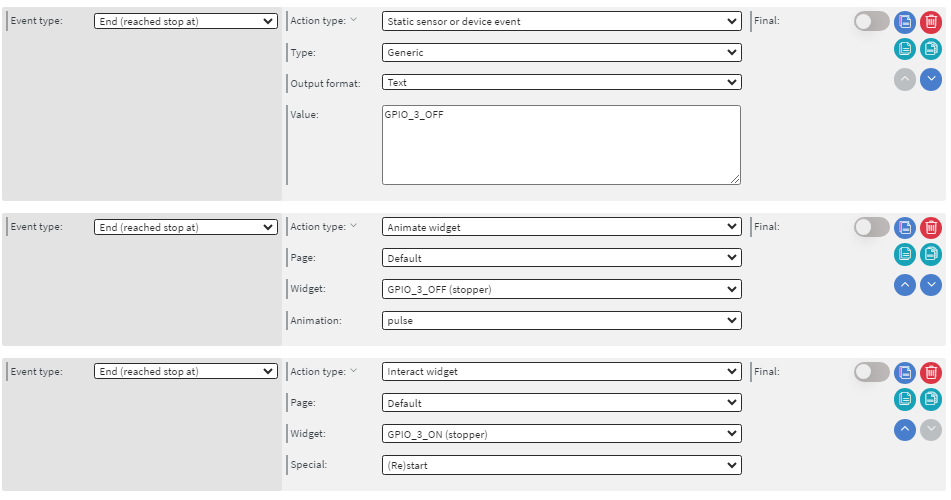
The last action you have to set on this widget is the following Animate Widget action.
This will indicate that the message has been sent to the sensor at the end of the timer, so you can see the state change in your content.

Off state on stopper widget
Repetative, indicator, generic
After you finished the ON state widget, you have to set the OFF state widget with the same method.
Tutorial
THERE IS NO TUTORIAL VIDEO YET :(