Screenshot datasource
Create datasource
Go to the Datasources > Click on the Add new inside the External datasource tab > Choose the Screesnhot type.
- You have to decide how your datasource updates from the original source, either by selecting a
Refresh Frequencyor by specifying aCron Expression - You can also assign teams to the datasource if necessary.
Please note
You can only create up to 5 screenshots in 1 datasource.
How to create the screenshots
-
URL
Enter the URL to create a screenshot from it. -
Image width
Here you can define the width of the screenshot.If you not set a width, a default value will be applied (1280).
-
Image height
Here you can define the height of the screenshot.If you not set a height, a default value will be applied (720).
-
Header
Headers are useful if you want to create a screenshot of a website that requires authentication. Format:{"Authorization":"Token"} -
Wait time (ms)
This is the amount of time to wait before a screenshot is taken. Wait times could slightly vary due to webpage loading times.The wait time can be between 500ms (0,5sec) and 15000ms (15sec). When left empty the default wait time will be 2000ms (2sec).
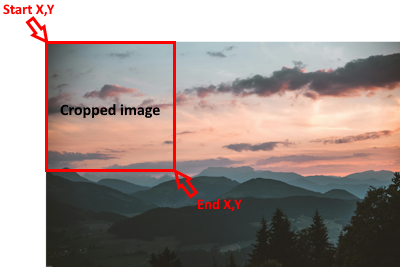
Crop settings
You can crop screenshots by setting the top left coordinates (Start X, Start Y) and the bottom right coordinates (End X, End Y) of the image section you
want to take a screenshot of.
For example:
- Start X,Y: 0
- End X,Y: 500
will give you a 500x500 pixel screenshot of your original image's top left corner.

ActiveIgnore Error counter
and the editor.
Cache external resourcesRemove broken external resource referencesRotate cache on every updateExchange internal resource referencesRequest settings
You can randomize arrays if you enable the Randomize arrays function.
4. If all this is done you can click on the save then you are done!