How to use Sensor Designer?
Sensor designer is an END OF LIFE PRODUCT this article is here for legacy support purposes ONLY
You do not need Sensor designer app to configure sensoring on your devices, you only need to set the appropriate sensor configuration
 |
|---|
Horizontal Menu
-
The Home menu navigates you back to the summary screen.
-
In the File menu, you can export sensor configurations and you can open them. You can also find the changelog about previous and current versions. In case you have issues with the application you can clear the cache under the Settings sub-menu.
-
With the WB Editor menu, you can open our editor website inside the application.
-
In the Help menu, you can find helpful information about sensors, units, and ports.
-
In the Examples menu, you can find some use cases to use our product.
-
The FAQ menu navigates you to the frequently asked questions screen.
Comm port and login field
 |
|---|
In the Communication Port section, you can set up a connection between an M5 device and the application.
For this, you need to connect the device to a PC via USB.
| • With this button you can change the baud rate which is the rate at which information is transferred in a communication channel. • In the serial port context, 9600 baud means that the serial port is capable of transferring a maximum of 9600 bits per second. | |
|---|---|
| • With this button, you can quickly connect to an attached device. • In this case, the application will auto-select the port and set up the connection to the attached device. | |
| • With this button, you can connect over a preselected communication port to the attached device. | |
| • With this button, you can refresh the list of ports. | |
| • With this button, you can reset the ports. |
If you login to the server by filling out an E-Mail address and password you can select your customer and a screen.
 |
|---|
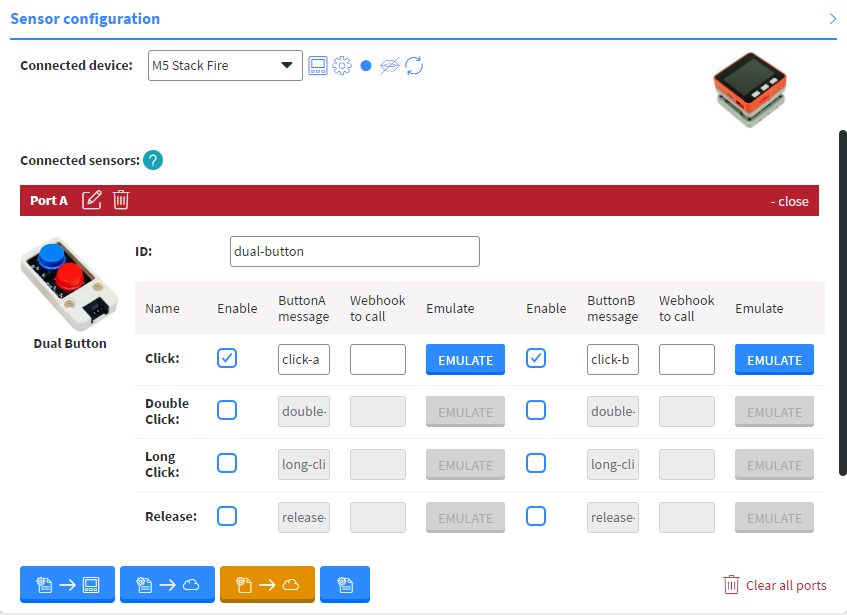
Sensor Configuration
In this field, you can manage the connected device and sensors.
 |
|---|
You can select the device type in the Connected device selector
| • With this button, you can open the firmware list. • Here you can burn the firmware to the connected device. | |
|---|---|
• With this button, you can ping the connected device. • This shows you if the connection between your PC and device is active. | |
| • With this button, you can restart the connected device. |
- In the Connected sensors section, you can set up the sensors connected to a device.
- Clicking on the button of a port will open up a list of sensors and units which can be connected to the device on the written port.
 |
|---|
| • With this button, you can remove the configuration you created. | |
|---|---|
| • Pressing this button will navigate you to our Knowledgebase article about Ports. |
- If you already have a sensor in the configuration two buttons can appear at the bottom of the section.
- The 'Set your USB device configuration' button will appear if you have a device connected to your PC via USB.
- This button sends the configuration directly to the sensor device.
The sensor device will get the new configuration when it is connected to a displayer device (for example to an Android TV box).
This option is used to test sensors.
- The 'Send Configuration to screen over the cloud' button will appear if you logged in to a server, selected a customer, and a screen.
- This button sends the configuration to the displayer device.
Serial monitor
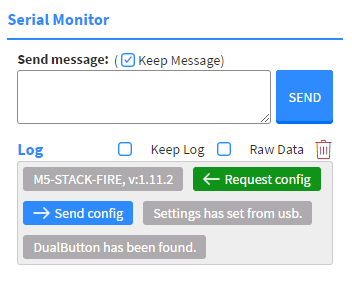
On the 'Serial Monitor' field, you can see the current log and send messages to the device.
 |
|---|
| • With this button, you can clear the log. |
|---|